Monday, February 21, 2011

Red Velvet Cupcakes with Cream Cheese Frosting


On a slightly more successful note (by comparison to my failed sorbet experiment), the happy ending to the weekend's tale of woe was the perfectly delicious Red Velvet Cupcakes with Cream Cheese Frosting I baked on Sunday afternoon.

I have always loved the combination of the earthy vanilla-chocolate sweetness of red velvet cake topped with the sour creaminess of the cream cheese frosting.  I also get a kick out of the contrast between the dark, red-brown colour of the cake and the whiteness of the icing.  But I have been a bit scared of making a red velvet cake myself, though god knows why because this was pretty straight forward recipe (even if it did make an exceptionally large number of cupcakes).  I think largely as a result of Saturday's sorbet trauma, I chose a recipe from Martha Stewart's Cupcake cookbook and stuck to it to the letter - I was not disappointed by the results!

The recipe helped me to conquer two kitchen-related fears:
1) using large amounts of vegetable oil rather than butter in cakes, and
2) recipes involving vinegar.
I'm not sure whether all the blog-o-sphere whinging about Martha's recipes relates only to her online site, but this recipe was seamless, well explained and absolutely delicious.  It's the second recipe I have cooked from this cookbook, and both have turned out beautifully.


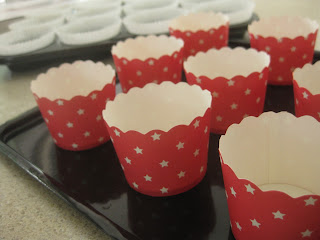
The cupcakes also gave me an opportunity to use one of the many items in my kitchen I unearthed in the New Year and pledged that I would not neglect for another year!  Yippee!!  So, now these gorgeous red and white cupcake papers have had a work out and boy are they convenient when you have a recipe that makes enough batter for 38 full-sized cupcakes and you only possess one 12-cupcake tin to bake them in.  I did 12 in normal white cupcake liners in my existing tin, and the other 12 in the red-and-white stand alone cups I had purchased about a year ago and never used.  Both shapes worked really well and to great acclaim when I presented them at a Sunday night BBQ and today at the office morning tea.  Snaps to Martha!

Red Velvet Cupcakes with Cream Cheese Frosting


Ingredients

2 1/2 cups sifted plain flour
1 1/2 cups neutral flavoured vegetable oil (I used sunflower oil)
1 1/2 cups white sugar
1 teaspoon sea salt (the little bursts of saltiness work perfectly with the frosting)
2 tablespoons cocoa powder (the darker and more expensive the better)
2 large eggs (the recipe says room temperature, but mine were out of the fridge and it was fine)
1/2 teaspoon red paste food colouring (you need to use a hell of a lot more if you only have liquid stuff)
1 teaspoon vanilla extract
1 cup buttermilk
2 teaspoons white vinegar
1 1/2 teaspoons bicarbonate soda

Frosting ingredients

1 cup butter (unsalted and softened)
12 ounces cream cheese (also room temperature - helps to whip it up real good!)
4 cups icing sugar (yes, 4 cups.  I know.  This makes one hell of a lot of frosting)

Let's start with the easy stuff - heat your oven to 175 degrees celcius.   Now, line your cupcake tins with pretty, pretty liners.


Now that you're organised, go sift your flour, salt and cocoa and whisk together until combined.  Pop the dry mix aside while you get out the Kitchenaid and deal with the wet ingredients.

Whisk the oil and sugar together until they're all combined, then add in your eggs one at a time, whisking together properly between each.  Add in the food colouring (beware, it will stain your fingers and your tea towels.  It's water soluble, so don't panic) and vanilla extract, and mix until combined - and a lovely bright red colour.


While your speed is low, add in a third of your flour mix, then half your buttermilk.  Then a third of your flour mix, followed by the other half of your buttermilk. Finally, add the last third of your flour mix and only use the mixer for as long as necessary to combine.

Now comes the fun chemistry part of the process.  Mix the bicarb soda and vinegar in a separate bowl and watch it fizz and foam.   Add quickly to the batter and mix for only ten seconds.  I don't know why the ten seconds (or the vinegar-soda mix for that matter) is necessary, but don't question the genius - this tastes amazing when it's done.

Okay, now fill your cupcake liners two-thirds of the way up and bake in the oven for around 20 minutes.  Test with a cake tester before you remove from the oven, to make sure it's cooked all the way through.  I used the "classic bake" setting on my oven, rather than the fan-forced oven setting and it worked a treat.

When they're done, pop them out of the tins and onto some wire cooling racks until they are completely cooled through.

Now, onto the cream cheese frosting - which was super easy (as long as your butter and cream cheese is room temperature)!  My expert cupcake-making-red-velvet-baking friend had advised me to ensure I whipped the butter and cream cheese first, before adding the icing sugar, otherwise it turns all soupy and doesn't taste nearly as nice.  Fortunately, that was exactly what Martha's recipe required...


Beat your butter and cream cheese until light and fluffy.  Add in your icing sugar, one cup at a time and making sure each addition is properly and smoothly whipped into the butter and cream cheese.  And that's it - done.

Ice your cupcakes and eat immediately.  Or not.  You can keep the frosting in the fridge for up to 3 days, and the un-iced cupcakes too - just make sure you return the cupcakes to room temperature before you serve them.

And they were a total hit.  Musky, earthy not-quite-vanilla-not-quite-chocolate with all the creamy, sweet-sour counterpoint of the frosting.  Highly recommended.


Failed whisky sorbet which became an Icy Mint Julep!

 Mr J hosted his first single malt whisky (or whiskey - we are all about the equal opportunity) tasting night at our apartment over the weekend.  To be fair the event has happened before, but it's the first time Mr J has had the event at his place.  It's a boys only affair, apparently, so I went out for a romantic dinner instead with the lovely Ms MC of Life Personal Fitness - who introduced Mr J & myself - as I had been requested to make myself scarce.  Each of Mr J's friends brought around a reasonably priced (around $70-80 I am reliably informed) bottle of single malt to share, and his ex-chef friend Mr S provided a wonderful three course meal to match the scotch.  Makes me wish I had stuck around.


The whole thing (actually mostly Mr S doing all the cooking) left me feeling a little bit extraneous, and hence I decided to contribute by making a whisky-inspired sorbet for the evening.  I loved the recipe for "Hot Toddy Sorbet" on the Murphy's Ice Cream Store blog .  I have also fallen in love with this blog, which features ice cream recipes for sea salt ice cream and blue cheese & shallot ice cream, amongst many I want to try.  If I ever go back to Ireland, this ice creamery is definitely on my "must visit" list.  Unfortunately, due to the failure of the recipe, I will probably not attempt another of their sorbet recipes.

That's right, it just plain would not solidify into sorbet, even though I used the right measurements for sugar, water and whisky - it's a gloriously delicious, whisky-flavoured slush, but not nearly a sorbet.  It's also so intensely flavoured that it would be a bit too much as a stand-alone dessert in my opinion.  I think by adding a little more water, though, it might just set properly and, given how delicious it is, I will definitely try again.

Unfortunately, I can't really give you a recipe for sorbet out of this entire debacle!  So I will simply give you the recipe as I made it and then explain how I added mint and a little more whisky to turn it into the most delicious Icy Mint Julep I have ever enjoyed!


Whisky "Hot Toddy" Sorbet which became Icy Mint Julep


Ingredients

-  350 grams white sugar
-  1 cinnamon quill
-  8 cloves
-  1 tablespoon fine grade marmalade (especially one which was cooked with whisky!)
-  100 ml whisky
-  75 ml fresh lemon juice
-  1 tablespoon honey
-  500 ml water

And to mix the drink:
-  1 bunch mint (washed)
-  a small amount of water to taste

This is actually ridiculously easy, so long as you don't expect it to turn out perfect sorbet!  Pour the water into a saucepan, add the cinnamon and cloves.  Boil.  Reduce to a simmer and add in your sugar, honey and marmalade, stirring until combined.  Set aside to cool a bit, then strain into a pyrex bowl (so the cloves and cinnamon are removed) and refrigerate until completely chilled (overnight is best, but a few hours should do the trick).  When it's cold and thickened a bit, remove it from the fridge and add the lemon juice and whisky.


Put this mix into your ice cream maker (yes, Snowy got another work out), the bowl from which has been freezing overnight.  Churn.  This will never come to that slushy-like consistency you will expect, at least not in a domestic ice cream maker.  My theory is that the recipe from Murphy's probably used an industrial freezer, which freezes pretty much anything you care to experiment with.

My poor Snowy worked really hard... but alas, no sorbet!
I think you can probably just put the super chilled liquid straight into a plastic container if you leave it overnight in the fridge and then freeze it overnight, without having to go to the effort of hooking up the ice cream machine.  Then you get this slushiesque, margarita-style texture and thickness that is really super delicious!

To turn this into your final drink just rip up around 6 mint leaves roughly and add to the bottom of a tumbler. Pop in a couple of ice cubes, then spoon the slushy mix over the top.  Add a nip of whisky (and a tablespoon of chilled water if you don't like it too strong) and serve, preferably with a couple of whole mint leaves on top as a garnish.  It's absolutely delicious and quite a find!

So there you have it.  I do make mistakes in the kitchen (quite frequently, in fact), but this one turned out to be a pretty tasty one, as mistakes go.

Sip.  Enjoy.  Repeat!


Tuesday, February 8, 2011

Food memories - palm sugar and black tea on a bamboo mat

For some reason I've been thinking a lot lately about the seminal food experiences in my life.   We've all had them - those food moments that have risen well above the day-to-day ho-hum meals we eat to keep ourselves fuelled.  For me, so many of my key memories are bound up in the things I was eating at the time.  And almost all my great travel moments involve food.

One such memory came back to me when I went looking at the markets for palm sugar.  My first real introduction to palm sugar was in Indonesia where they call it "gula merah" - red sugar.  Certainly palm sugar does get a certain claret colour as it ages and dries, but when it's young and fresh it's actually the colour of caramel creams (and just as delicious).

All the ingredients for Indonesian satay - including fresh palm sugar

This was when I was studying Indonesian in Yogyakarta and my language teacher, having heard me talk (haltingly) in Indonesian about food all day long, had finally decided it was time for a field trip.  I had just recovered from my first major stomach upset (I never could say no to delicious street food), so I was initially nervous about departing from flushing bathrooms, to say the least.  But Geger was taking me to Borobudur temple (a World Heritage Listed site) with a "surprise" detour on the way home, so I agreed to come along.

Enroute to the main event (the temple, remember) we turned into a small village, or kampung, of traditional homes constructed of woven bamboo mats and dried palm-leaf thatching.  My teacher confidently navigated us through he narrow streets and past a number of roving chickens to the home of an older couple who, though well past Australian retirement age, made their living harvesting the sap from palm trees and boiling it into a treacle-like syrup which they then poured into coconut-halves to set into the half-round shapes we're familiar with in stores.

Fish market near Yogyakarta

We arrived to find Ibu crouched over a bubbling pot of caramel in its final stage of preparation over a wood-fired stove.  She stirred the pot gently every so often, scooping the surface-scum and foam from the liquid and  was seemingly unaware of her audience.  Finally, she scooped the molten sugar into the coconut moulds and, when there were only scrapings left in the pot, took some spoons and twirled the caramel around them, passing them out for us to taste.

I can't describe to you the rich, dark sweetness of the fresh sugar.  The closest you can come to the flavour is a dark, gooey fudge, which is almost exactly the right texture of freshly cooled palm sugar.

Every type of banana you could ever want.  Ever.

Ibu brewed us some black, bitter tea and then plopped two large chunks of the fresh sugar in each tin cup.  As I sat there on the bamboo mats on the floor, sweating in the humidity and drinking my dark, sweet tea, I thought there really wasn't much better in life.

Back in Canberra, no matter how much I search the local Asian grocery stores, I've never been able to find anything to match the caramel of Ibu's fresh-made gula merah straight from the pot.  I doubt I ever will.

Duck eggs at the local markets

Saturday, February 5, 2011

Guacamole on a hot summer's afternoon

I think my favourite dip has to be home-made guacamole - or maybe I should more correctly call it avocado dip, as I am not entirely sure what an "authentic" guacamole should like.  Practically everyone you ask has a different opinion, but this is the version most like the guacamole a Mexican friend used to make, so I am still sticking with "guacamole" in my post title.  So there.


Anyway, for this recipe you need at least one nice ripe avocado, possibly two or three if you are feeding a crowd (just bulk out all the other ingredients accordingly).  But for two people - in this case Mr J and I - one avocado produces just the right amount of this lovely, zesty afternoon snack, which is especially yummy with a chilled Corona in hand (although I understand Corona is to Mexicans what Fosters is to Australians, so apologies to anyone from Mexico who might happen to come across this post!).  I particularly like to serve this with large, salty corn chips which are big enough to scoop up the chopped tomatoes and red onion mixed throughout the dip.


I guess there are some non-traditional things I like to mix through the dip too.  Number one on the list would be sumac, if you can find it, which is a Middle Eastern spice which works wonderfully with avocado and tomato.  It is a powder which is a red-brown colour and a vaguely lemony taste, and it really sharpens the flavour of the dish.  Alternatively, if it's available (usually from my mum's garden) I also sometimes like to squeeze in the juice of a kaffir lime.   They don't contain a whole lot of juice, but if you add the juice from half a normal lime too it all evens out.  The kaffir lime provides a wonderfully aromatic flavour which I love, but I have read in a few recipe books that the juice of the kaffir lime is too bitter to be used in cooking.  I heartily disagree, for what it's worth.


Guacamole

Ingredients
-  1 avocado, ripe but still firm
-  1 tomato, diced
-  1 red onion, diced (finely)
-  1/2 cup chopped coriander
- 2 pinches of salt (to taste)
- 1 pinch sumac powder
- juice of one lime

First chop up the avocado and scoop it into a medium-sized bowl, then mash with a fork.  Add the lime juice and salt and stir immediately.  This will stop the avocado from discolouring.  Now stir through the diced tomato, red onion and coriander, and then the sumac powder to taste.  If you want to use a kaffir lime instead, this would be the time to grate in a little of the zest and squeeze of kaffir lime juice, instead of adding the sumac powder.


I usually move the dip into another bowl to serve, just to make it look prettier.  Honestly, there's nothing more easy to whip up for a snack and, if you suddenly find yourself with a crowd and only one avocado, increase the amount of tomato or pop in a dollop of sour cream to bulk it out.  Just remember to add a little more of the salt and spices.   Oh, and I have heard that it's traditional to keep the avocado pits in the serving bowl, but I think it just gets in the way of scooping up the dip.


PS If anyone can recommend a Mexican beer (other than the ubiquitous Corona) to drink with this, I would be much obliged.

Thursday, February 3, 2011

Beach Post - Berry picking and breakfast crepes

So I have returned to the blog, riding a cloud of relaxation, from a full week at the beach (the other week with sans post is explained by the hugeness of the pile of work waiting for me on my return).  We stayed at a lovely beach house in Lilli Pilli on the South Coast, near enough to the beach that you could hear the waves crashing at night, but nestled in quiet bush land with the tallest gum trees I have ever seen.   Every morning we woke up to the sounds of the birds and the sea, read our books for a while, contemplated a swim at some stage and then, as often happens with Mr J and I, our minds turned to breakfast, lunch and dinner.


It also just so happens that my birthday fell during our beach week and was duly celebrated with a lovely dinner of coconut prawns (shrimp to my American friends) and char-grilled vegetables served with chilled New Zealand champagne in my "new" vintage glasses (thanks, Mr J - he carried them the 2 hours down to the coast in his motorcycle bag.  That's commitment!).  I will definitely blog about the prawn recipe shortly, which is actually my mother's and one of the vast array of yummy dishes served at the family Christmas feast.  It's definitely a keeper - simple, delicious and a real treat.  But more about that later...


First and foremost, I want to tell you all about the berry picking we did on my birthday!  It was an epic journey, as the "Gourmet's Guide to the South Coast" didn't really tell us that the windy, dirt road from the highway to the farm was 12 kilometres long... and it didn't help that we got stuck behind a very frightened Russian tourist family in an entirely unsuitable car (Prius) for the conditions who were determined to do 10 kilometres per hour the whole way.  But, thankfully, we made it there in the end, somewhat dusty, but safe and sound and ready to pick ourselves some berries.


The Clyde River Berry Farm is one of the suppliers at the Canberra Region Farmers' Market every Saturday morning while the berrying season lasts.  Mr J's stepmum raves about their blueberries, so I was keen to see how they grow their berries (and what other lovely varieties they produce) ... and of course, pick a bucket-load of myself.

The Farm is a self-sufficient oasis in the middle of a forest, cleared by the owners in the 1980s.  They then planted the various types of berries and stone fruit, built a mud-brick home and put up an array of solar panels providing the property's electricity.  It's a lovely place, with the cutest little puppy who meets you on arrival to say hello and accept a few pats.  You grab yourself a bucket (or two, or three), hopefully a hat and some sunscreen (it was 30 plus degrees on the day we were there) and head straight out to the parts of the farm still fruiting.

On the day we were there the blueberries (all four varieties) were in fruit, the blackberries just beginning their season, and a couple of nashi and blood plum trees groaning with fruit.  We helped ourselves to a couple of kilos of different types of blueberries, which you literally "tickle" from the trees, and half a bucket of blackberries.  To be honest, I was a little plum-ed out after the last couple of months, so we gave the blood plums a wide berth!

When we were done, we took our bounty back to the farm shed to be weighed and decided to treat ourselves to some home-made peach and strawberry ice cream.  I have now been ruined for all other ice cream - it was so delicious!  They use a strange machine to grind the fresh fruit from the farm into vanilla ice cream.  It then pipes out the flavoured ice cream like a soft serve and on a hot day after some berry picking in the sun, there really is nothing better.


Later that week I decided to use the berries we picked in some morning crepes.  I made a stack of simple thin pancakes, rolled them up with the berries and a small sprinkling of sugar and a squeeze of lemon juice, and devoured them with freshly brewed coffee.  The combination of the tartness of the berries, the sweetness of the sugar and the edge the lemon juice gives to the flavour, was divine.  And well worth the effort of getting out to the farm and picking the berries in the heat.

A week later and the berries are still in great condition in the fridge and I plan to use the last of them to make a berry ice cream, which I will no doubt inform you all of at a later date.

Mixed berry crepes


This recipe is only very slightly adapted from Margaret Fulton's The Margaret Fulton Cookbook, an Australian classic.  I usually take my 2004 edition with me down to the coast because it has so many basic, never-fail recipes.

Ingredients

- 1 1/4 cups plain flour
-  2 tablespoons sugar
-  pinch of salt
-  1 1/2 cups milk (plus a bit extra to thin the batter after it sits for a while)
-  3 beaten eggs
-  2 tablespoons melted butter
-  1 teaspoon ground cinnamon
-  1 teaspoon vanilla extract
-  2 tablespoons caster sugar
-  2 cups mixed berries
-  1 lemon, cut into wedges

Margaret tells you to sift the flour, sugar and salt into a mixing bowl... I didn't and it probably needed it, but there was no sifter available at our rented beach house.  Stir the dry ingredients together (including the cinnamon).  Next, mix the eggs, milk and vanilla extract together in a separate bowl and then add to the dry ingredients.  Mix until smooth.  Stir in the melted butter.  Allow the  mixture to stand.

Margaret asks for 2 hours.  With Mr J getting slightly grumpy as his blood sugar plummeted, I left it for 1 hour.  At that point it had thickened too much, and I added a couple of tablespoons of milk extra to thin it out a bit, so it would spread better in the slightly dodgy pans provided at the coast house.  To be honest, without a proper crepe pan, or at least a non-stick pan, it's difficult to get perfect crepes.  But they all taste the same, even if they are a little wonkier!

Heat up your pan and add a small amount of butter to the pan.  Pop in about a soup ladle's worth of batter and quickly turn the pan to make it as thin as possible.  I do it in circular motions, which gives the crepes a vaguely spiral pattern...

I usually have the oven pre-heated to about 100 degrees celcius and, as crepes are cooked, I deposit them on an over-proof plate in the oven, which keeps them nice and warm (and the edges crisp, which I love).

When you have a nice, high stack place it on the table.  I usually pop the berries, sugar and lemon wedges in separate bowls on the table and let people construct their own crepe with the toppings of their choice.  For me, I like to take an open crepe, scatter some berries, about a teaspoon of caster sugar and a small squeeze of lemon juice, then roll it up like a cigar.  It's equally good with just the lemon and sugar. Delish!