Saturday, March 26, 2011

Slow pot-roast veal with leeks and white wine

One of the best parts of my chosen career is the way that old friends keep arriving back in Canberra and adding to my circle of friends, enhancing the flavour of the local social stock like herbs thrown into a bubbling soup pot.  The latest arrivals to add zest to the Canberra scene are the Duckworths, who are rejoining the group after three years in Cambodia.   In honour of their return, I decided to have a welcome back dinner - something warming and delicious given the newly-chilly autumnal weather.

IMG_5612


I had a deboned, rolled shoulder of veal in the freezer, care of my wonderful mother, and decided a slow pot roast was the way to go.  It's a fabulous cut of veal and is traditionally slow roasted in wine by Italian families the world over.  This was a bit of a last minute decision, so it was lucky that in my travels to the Farmers' Market that morning I had purchased a bunch of small leeks, fresh herbs and button mushrooms, all of which complemented the veal and ended up as the base of the pot roast.


IMG_5632


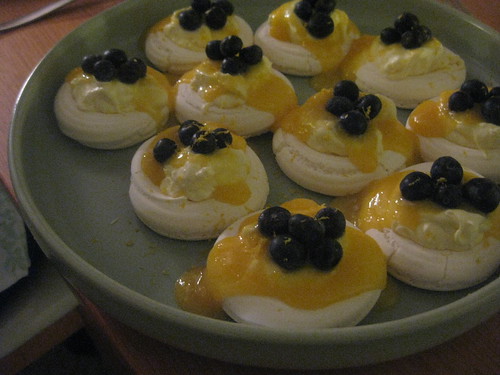
We were also very lucky to have the delightful Ms C at dinner, who whipped up a delicious dessert of meringue nests, whipped cream and blueberries, all drizzled with home-made lemon curd (incidentally, she also gave me the "goddess of hunting" spice mix used in the pot roast from her recent trip to Melbourne).  It was a lovely night, with the food complementing the excellent company.


Slow pot-roast veal with leeks and white wine

Ingredients

- 1 kg deboned & rolled veal shoulder
- 6 button mushrooms (Swiss Brown mushrooms would also be excellent)
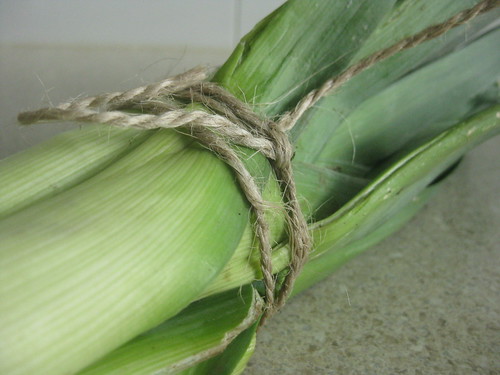
- 4 medium-sized leeks, finely sliced
- 1 garlic clove, crushed with the back of a knife and then diced
- 2 tablespoons chopped fresh sage leaves
- 1 teaspoon chopped rosemary leaves
- 1 bottle full-bodied dry white wine (750 ml)
- 1 tablespoon olive oil
- 1 tablespoon butter
- 1 cup stock (vegetable, veal, beef or chicken, I am not fussy)
- 1 tablespoon "goddess of hunting" spice mix*
- 1 tablespoon porcini powder*

* These ingredients can be exchanged for the following:
-  1/2 teaspoon ground cinnamon
-  1/2 teaspoon ground juniper berries
-  1/2 teaspoon ground black pepper
-  1/2 teaspoon ground coriander seed
-  5 dried porcini mushrooms, reconstituted in 2 cups boiling water (use the water - strained - instead of the stock as well)

IMG_5601

IMG_5609


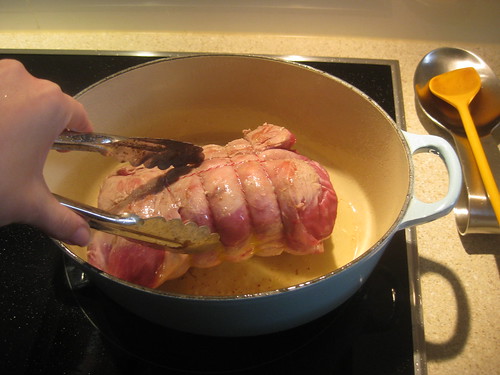
Heat your olive oil in a cast iron casserole pot over a medium-high heat, then brown the veal shoulder on all sides.   Remove and set aside.  Add the butter and, when melted, soften your leeks (with a pinch of salt), but do not let brown.  Add the garlic, chopped sage and rosemary, porcini powder and spice mix (or equivalent ground spices if these ingredients are not available).  Stir until combined and aromatic.  Add in the button mushrooms (and the reconstituted porcinis, if you are not able to find porcini powder).

IMG_5610


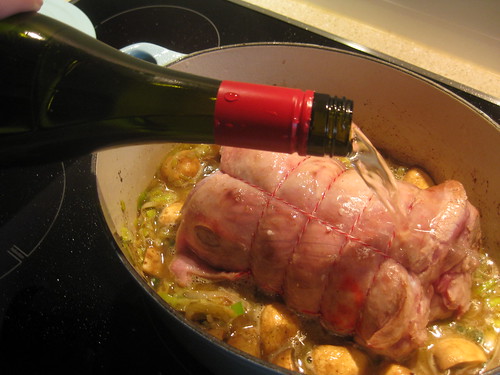
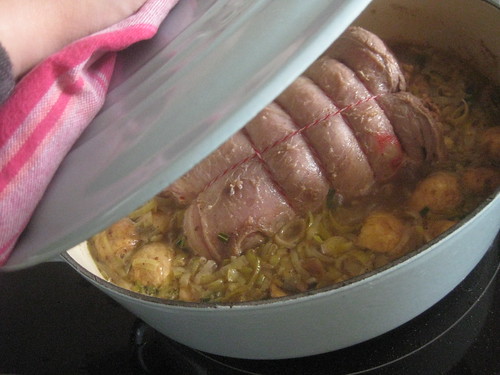
Pour in 1 cup of white wine, stir and scrape off the yummy brown bits at the bottom of the casserole dish left from the browning of the meat.  This process is called deglazing and your wine should bubble and sizzle.  Pop the browned veal on top when the sizzling ceases, then add the rest of the wine and around 1 cup stock.  This shouldn't completely cover the veal, but should come up to the 2/3 high mark.  When the liquid has heated up, reduce the heat so the broth is at a slow simmer.  Place the lid back on the casserole dish and leave for approximately 2 hours, checking every half hour or so, and turning the meat in the pot so the veal stays moist as it cooks.

IMG_5616


At the 2 hour mark, remove the veal from the pot and rest in another dish, covered in foil.  Meanwhile, increase the heat in the pot so that the remaining liquid reduces down by half - this should take about 5-10 minutes.  Finally, add in salt to taste and the thickened cream.  Stir, taste, and add in more salt and porcini powder if it's tasting a little bland.  I also added a small amount of truffle mash, which you can get for a bit of an outrageous sum from the Essential Ingredient.  Well worth it, if you ask me, but the sauce will still taste amazing, even without it.

IMG_5625


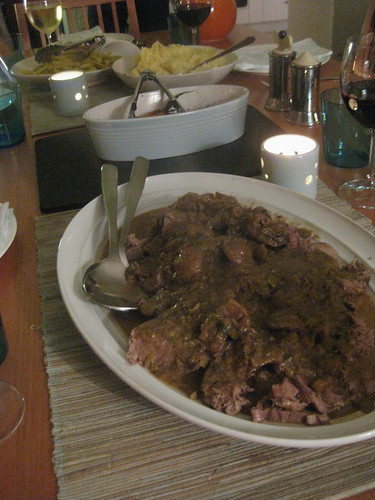
Now, carve your veal into slices.  The veal was so amazingly tender that it almost shredded apart as I cut it.  I placed the pieces on a large serving dish and then ladled the sauce over the top.  I served it with mashed Dutch Cream potatoes and steamed butter beans fresh from the market.  It was truly one of the most delicious meals I have ever cooked (even if I do say so myself).  Not only that, it was super duper easy, and I was able to sit back and have a drink with my friends, rather than phaffing about in the kitchen.

One rolled shoulder of veal.  One bottle of wine.  Leeks and onions braised in butter, garlic and herbs.  Two hours.  An excellent investment.

IMG_5628

Wednesday, March 23, 2011

Banana and Choc-Chip Muffins

IMG_5533
My new-old vintage pyrex bowl.  Love the print! Just don't wash it in the dishwasher, or it will disappear.

I have noticed an alarming trend in the preceding posts...everything is served in cupcake/muffin sized portions. Sadly, this trend continues in this post.  It's not through any sort of design or intention - I just happened to have some old friends popping in for coffee on Sunday and needed something quick and yummy to serve, which also used the over-ripe bananas getting progressively darker and mushier in my fruit bowl.

IMG_5554


IMG_5556


Result = banana muffins.  Plus I happened to have some Lindt chocolate in my cupboard, and we all know chocolate goes absolutely fabulously with banana (don't we)?  The only thing which doesn't go well with chocolate and banana is cheese - which is a strangely popular combo in Indonesia.  I tried it once, and it really did not thrill me.  Hence the lack of cheese in these otherwise delicious muffins!


IMG_5573


These babies were particularly great warm, so if you eat them after that just-out-of-the-oven glow, I recommend heating them up in the microwave for around 20 seconds. Melts the chocolate to just the right amount of mushy, glossiness.

Banana and Choc-Chip Muffins

Ingredients
-  2 cups self raising flour
-  1 pinch salt
-  1/2 cup caster sugar
-  2 overly ripe bananas, mashed with a fork
-  2 eggs, beaten
-  1 teaspoon vanilla extract
-  1/2 cup milk
-  70 grams melted butter
-  1 cup chopped high-quality dark chocolate (I chose Lindt)

Don't forget to heat up the oven to 200 degrees Celcius - and use the classic bake setting.  Fan forced just makes the muffins look a little lopsided, at least in my oven.

IMG_5546


Next up, melt the butter and put it to one side -  I do this in the microwave in a pyrex bowl, at 20 second increments.  Easy peasy, and saves me the extra washing up involved with melting the butter in a separate pan.

IMG_5538IMG_5542


Mash the over-ripe bananas in a bowl with a fork.  Also put this aside.

Then, in a large bowl I sieved the flour and then whisked the salt and caster suger through (I am a convert to the whole whisking thing, ala Martha Stewart).  Leave this to one side.

With a large wooden spoon, add the eggs, milk and vanilla extract to the dry ingredients.  Fold through, but do it quickly - the fewer strokes, the lighter the muffins will be.  Next, add in the mashed bananas and chopped chocolate.  Don't over mix, just fold it in.   (Some people like choc-chips you buy pre-made, but frankly I am not sold.  They are usually average-grade chocolate, and I prefer the process of chopping up high-quality chocolate... not to mention eating it!)

IMG_5559

IMG_5530


Now, spoon the batter into patty cakes - this should make around 12.  I used black liners I had bought specifically to use at Halloween, but I never seem to find the time to use them when I am otherwise occupied by organising the party of the year.  Hence, I used them for these tasty muffins instead.

IMG_5563


Now pop these into the oven for between 20-30 minutes (don't forget to check on them) until they are golden brown and a skewer poked in them comes out clean.  I recommend serving them warm with a hot cup of coffee and some very good friends to enjoy them with you.

IMG_5569

Wednesday, March 16, 2011

Devil's Food Cupcakes (To Cure All Ills)

IMG_5500

The lull in blog posts has largely been due to two things; too much work (aka too many revolutions and natural disasters) and a small dose of broken heart.  Alas, Mr J and I have parted ways, so there will be no more tasty whole-animal-spit-roast events... at least until I figure out how to do it myself!

Given the sadness of recent times, both on my own part and for people around the world who have so tragically been affected by the earthquakes and tsunamis in Christchurch and Japan, I thought it was time for some sweet sweet baked treats.  I certainly felt a whole lot more together while I was measuring and mixing and melting and baking.  It's amazing how the process helped me move from feeling crazy out of control to a measure of contentment and healing.  Thus the power of cooking.

And so I bring you Devil's Food Cupcakes (To Cure All Ills), care of Martha Stewart's marvellous "Cupcakes" cookbook.  In retrospect, I should probably have read the recipe more closely before embarking on this one - it seemed simple, it involved chocolate and used up my yummy sour cream bought straight from the dairy man at the farmer's market a while ago.  Beyond that, I just assumed it was your basic, "cream butter and sugar, add eggs and flour, bake" kind of recipe.  But you know what they say about assuming!  This was in fact quite an involved recipe, and quite unusual for a "Martha" cupcake recipe in that it used butter rather than vegetable oil.

I guess the key differences between this and most of the other cupcake recipes I have used were the fact that I had to melt the butter and sugar together first, then whip it for 4 minutes while it cooled in my KitchenAid.  I also had to mix the sizable amount of cocoa with hot water into a deliciously chocolate-brown paste before adding it almost at the end of the recipe.  Sour cream was also added, replacing the milk.  The result was an absolutely delicious, dark chocolatey, rich and moist cupcake that will most definitely be a permanent feature in my repertoire.

IMG_5477


I topped these cupcakes with a brown sugar cream cheese frosting (yum!!!!) and added as a final touch some crystalised violets my Mum bought me from Essential Ingredient yonks ago, which had been sitting rather forlornly in my pantry.  The result was very well received, despite some strange rising shapes reminiscent of souffles in some of the cups as a result of me using the fan forced setting on my oven rather than the classic bake setting.  You live and learn, don't you?  Guess that's the takeaway message from my week.

IMG_5508


Devil's Food Cupcakes (To Cure All Ills)

Ingredients

- 3 cups plain flour
- 1 1/4 teaspoons sea salt flakes (I like Maldon)
- 1 teaspoon baking powder
- 1 teaspoon bi carb soda
- 3/4 cup cocoa (Dutch process)
- 3/4 cup hot water
- 1 1/2 cups butter
- 2 1/4 cup white sugar
- 4 large eggs
- 1 1/2 tablespoon vanilla extract
- 1 cup sour cream

Brown Sugar Cream Cheese Frosting Ingredients
-  1/2 cup butter (room temperature)
- 8 ounces cream cheese (room temperature)
- 1 cup raw caster sugar
- 1 teaspoon vanilla extract

To start with preheat your oven to 170 degrees Celcius, and pop some cupcake cases in your pans - this should make approximately 36 cupcakes according to Martha's recipe, but mine made around 24 cupcakes - half large and half medium-sized.

IMG_5485


Next step, pop all your dry ingredients (flour, baking powder, bi carb soda and salt) into a big bowl and whisk to combine - I know it sounds weird but whisking it really does keep it light, without having to sieve the flour.  But if you want to sieve it, be my guest - it may be even more delicious.

IMG_5465


IMG_5468


Now, in a second medium-sized bowl, use yet another whisk to combine your cocoa and hot water so it forms a deliciously glossy chocolate paste.  Yum!  Did I mention I am a fan of the whisk?  Just look at my collection of different sizes... I love the small ones for things like salad dressings.  But I digress.

IMG_5470


IMG_5474


So you've put your dry ingredients and cocoa paste to one side, and then set up your KitchenAid (other mixer or hand beater).  Now, melt on a medium-high heat the butter and sugar in a medium saucepan.  When it's melted, pop it into the mixer bowl and beat for about 4 minutes on a medium-high speed until it is cooled and getting fluffy.  (See, this is where it starts seeming like a particularly complicated recipe, for a cupcake recipe, but the results are worth it.)

IMG_5479


IMG_5487

Now add each egg, beating between each addition until they are completely incorporated.  When this is done, add half the dry flour mix, followed by half the sour cream, then the last of the flour, and then the last of the sour cream.  When it's all mixed, add in the cocoa paste and the vanilla.

IMG_5489


Mix just until it's all combined and starting to look thick and unctuous.   Absolutely fabulous, this delicious batter will call you to leave rather more in the bowl than you have intended, just so there's more for you to lick at the end!

IMG_5493


Now, fill the cupcake tins/liners to about 3/4 filled.  Pop in the oven for around 20-30 minutes, until a skewer comes out clean.  Let them cool completely before you ice them.

While they are cooling, it is time to make up your icing.  Beat the butter and cream cheese together, then add the sugar and vanilla.  Easy peasy.  And super, super delicious.  It's certainly a crowd pleaser!

IMG_5503


IMG_5505